Spent some time setting up a new laptop today and saw this error: PowerShell is required to use the Deployment Workbench. Found that to be weird considering I JUST used powershell to install MDT. Turns out I had forgot to set the execution policy back to RemoteSigned. Today, I learned: Powershell needs to be set to RemoteSigned the first time you run MDT.
Just got a pallet of fresh off the truck Lenovos in today, and of course if they don’t get the shiny new Windows 10 image here quick I won’t hear the end of it. Naturally, the first thing I want to do is image them, but I found it strange when I was prompted for the system type when assigning the hostname from the LTI wizard.
The wizard was showing %ComputerTypeName% and the serial with an error, that hostname was too long it said.
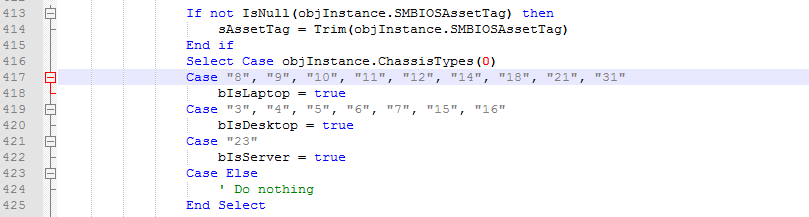
The only explanation was that for some reason these systems were failing to identify as laptops, as my customsettings.ini file is supposed to set hostnames based on a basic FormFactor and Serial Format. To make matters worse, this throws a wrench in all kinds of stuff like what OU and applications they get during deployment, so this was a problem that needed an immediate solution. Some googling led me to the wmic command to determine “chassistype” and I got a chassis type 31. Then I found this…
Chassis type 31 is “convertible” and I wondered, “Isn’t this all in the ZTIGather.wsf?” Sure enough, adding ,”31″ to the end of ZTIGather.wsf solves the issue….
It’s Friday, I’m going home. Its been one of those weeks, and next week is go time…
Update 4/6: Just got an e-mail from Paul at 1E mentioning I should “include a reference to table 17 in this document: http://www.dmtf.org/sites/default/files/standards/documents/DSP0134_3.1.1.pdf. It lists the official chassis type and thus gives us all confidence that we’re handling the new values correctly.” Thanks Paul!
Update 1/2018 99% sure this has been fixed in the latest build of MDT.
Now, I’ve known for a while there’s a way you can use MDT to wipe systems after you’re done with them. I know this isn’t some kind of KGB/CIA proof standard of wiping things, but it does the trick since I have PCs we were evaluating and I just need to send them back to the reseller. In this case, I’m dealing with systems that simply won’t boot to USB thanks to our wonderful secure boot technology, bargain bin USB flash drives so I need a task sequence based solution.
So, it really is pretty straight forward, just use the replace task sequence, and create a task sequence that’ll reboot into WinPE and wipe the disk. At first it didn’t work, buy
Create a Standard Client Replace TSNote that by default there are conditions to running these steps. I added WipeDisk=TrueNow, just browse to your share and run your shortcut to the wizard. Don’t run MDT from UNC? You’re doing it wrong.Yeah, We got a task sequence for that!WinPE is downloading! Reboot is Next!Really I just wanted an excuse to show my WinPE wallpaper…
Okay, I know this wouldn’t fly at the DoD and all you tinfoil hat wearing mouth breathers are yelling “BUT THE GUBMENT CAN STILL GET MY DATA!” Okay, Okay, If three wipes of zeros don’t assure the Fox Mulder in the back of your head. We need to look into some serious data sanitation napalm. This is where sDelete comes in handy.
For you security types: check that out, it’s a SCCM task sequence, but it’s the same idea, no reason why it wouldn’t work with MDT. If you’re still that opposed to writing zeros or using sDelete and insist on using a DoD certified solution by hand, look into DaRT, Microsoft’s free¹ USB repair utility for Software Assurance Users.
¹ Free as in your employer pays lots and lots of money for a Volume Licensing Service Agreement or are a bad person that downloads software from bad places.
I hadn’t seen this one for a good minute, and I remember why. There are several reasons you can get this error. Sometimes you just need the driver. However the error screen will almost always tell you that you’re missing a driver, and no amount of clicking retry will fix that. Other times you’re genuinely seeing some kind of delay with the assignment of a DHCP address and fancy new hardware boots quicker than the network can get the systems IPs.
I know in the past I was able to add some kind of delay to get MDT to wait and then try to resume the task sequence, but I couldn’t remember what or where, so off to the googles I went…
Then I remembered, yes, there is a delay we can add to the main heart and soul of MDT, the script of all scripts, the holiest of holies, the LiteTouch.wsf I hate doing this, I hate the idea of editing the scripts provided by Microsoft, because you never remember what you modified and where after an upgrade or after building a new share. But then again, you know what they say, “When in Rome Do as The Vandals!” Also, I’m tired of having to walk over to computers in our training room and clicking retry, so there’s that too.
Anyway, like Kyle describes in the abovementioned article, if it is a genuine delay in the DHCP assignment of an IP, we’ll need to add a delay in the LiteTouch.wsf script.
Look around line 1268. In this case, I’m adding a whole 10 seconds because I don’t want to come back and do this again if 5 seconds doesn’t cut it so I add wscript.sleep 10000 at line 1270. Lines 1269 and 1271 are optional snark that in theory will help me find it if I ever need to again.
Your Milage May Vary and as Johan says, “Happy Deployments!”
Look, I don’t work for Microsoft, I just support their software. I have no idea what the hell -2147024890 or even what 0x80070006 means. It’s computer babble for something bad happened, sorry. I could also look up the hex code and change the hex into something else and check the log files, all of which I did, but nothing jumped out as to why. The task sequence ran fine on everything except this ONE pc in the lab, so What the heck?
When in doubt, run the LTICleanup.wsf file from WinPE. Press F8 and run LTI Cleanup. If you’re doing in place upgrades, you can even just run it from plain old windows. Browse to the \\Servername\Share$\Scripts folder and run LTICleanup.
That fixed it, go figure. Your milage may vary, but sometimes when MDT is being dumb, just run the cleanup and start from scratch.
Had the privilege and honor of studying under both Johan Arwidmark and Mikael “The Deployment Bunny” Nystrom in Redmond WA for a week this last summer. During the session Mr. Nystrom brushed up on using ZTIGather.wsf to debug customsettings.ini verbosely from the command line instead of actually kicking off a deployment and crossing your fingers.
I had known it was possible, and I had done it before, but didn’t need to do it in a long, long time until today and in an attempt to find his again, I stumbled across this…
In the article, he’s referring to a local install of CMTrace, in this example I am running it from the server. I figure the PC I am testing on may not always have it installed, but the idea is the same, run the gather and run CMTrace and open the log file! Its that easy! My buddy from Questa thinks this is pretty cool! Thanks to Mikael for the good idea!
CMTrace is a beautiful thing, calling it programmatically is even more beautiful…
This version allows you to call it from any PC at anytime.
Just as I had convinced myself I had solved this, it’s back…
A clean MDT2013 task sequence, with a recently built hybrid image really shouldn’t ever take much more than an hour at the most to complete. I have a land speed record of 18 some minutes on bare metal from PXE. MDT should drop an image, patch it, install mandatory apps like antivirus and management clients then join to the domain in about 30 to 45minutes. But once again I’ve been seeing PCs sitting on ‘Searching for Updates’ for over an hour dragging this out close to two hours.
Checking the BDD.log file, there it is…
Windows Update in MDT Taking FOREVER to search for updates.
I received an e-mail today from a reader who was asking about why I use two deployment shares, why not just one? In his defense, I think he was confused, but I’ll try again to stress that MDT can be used to build images for us, and that this is preferred for many reasons, the least of which is just saving time. If I can automate it, why do it by hand? Anyway, here’s a rant laced with excerpts from the exchange.
I use two shares, one to build images and another to deploy them. The first I name BuildShare and the second I name ProductionShare. In my image, I put Office, DotNet Framework, Visual C++, and Silverlight. I don’t put much else in there, but I let MDT patch those and then there’s some reghacks I run for branding and/or defaults I want to bake into the image. This is just a standard client task sequence that’s set to capture the image for me at the end since it IS a separate share and it is set to do captures at the end of running task sequences.
This is the reason I use a separate share. It is so that I can configure the customsetting.ini file to automate a large part of the capture process. I simply set DoCapture to yes and by running a standard client task sequence, MDT will capture the image for me! I can then take a fully patched system and send it off to the production share. That’s what installs Flash, Java, Adobe, all that crap that’s always changing or depending on dept. Its easier to just update the MSI in the share once and be done with it.
This task sequence is fully automated, the hardest thing I have to do is simply boot a VM and select what TS I want to run, and go get some tacos. MDT builds and captures the image for me.
Why even image at all? Why not just install everything by hand? We use images to save time. Its all about that final deploy time. Often when you need to re-image a broken computer, that PC needed to be ready hours ago, but it’s not, it’s dead because some user clicked god knows what in an e-mail. Deployment’s more than just about bare metal installs, this is about being able to use operating system deployments for break / fix. The better patched that reference image is, the faster we can get users up and running and back to work. Fewer things get clients excited than telling them that not only can MDT image the PCs, but it can build these images for us as well. My build lab builds me a new “shinny” image every month and our deploy times stay under half an hour. The older I let reference images get, the more patching they need before I can let a user sign in.
The BuildShare builds me a variety of images, Win7, Win10 and Server in just a few clicks.
Having a build share allows me to build a new image and automate that build process and save hours in the process. This then also has the advantage that I can reliably repeat the EXACT same capture six weeks or six months later when I need a new image with all the new patches, and I can keep my deployment times low.
The time to install office may seem minimal now, but the time to patch office, dotnet framework, visual C++ and the core OS grows and grows and grows as the image gets older and older. Simply put given enough time this patch time balloons from a dozen updates into hundreds of updates and your ability to patch a thin image on the fly becomes less and less reliable. I’ve seen a 14 month image go from 28 minutes to deploy to almost three hours thanks to office and dot net service packs that need to be downloaded and applied. Its just more reliable to have a TS that can cook a new image for me that I can reliably run once in a while to keep those times down because I can promise you the one hour difference you see now between a thin and hybrid image today becomes more like three hours a year from now. I’m not suggesting you put java, flash and adobe reader in the image, just put office as well as visual C++ runtimes and dotnetframework because MDT can at the very least patch those prior to running sysprep and capture for me. Think of this ‘hybrid image’ as a software installation platform that your core line of business applications will need to sit on.
With all that being said, its important to note that there are very specific things that should be done on your production share’s task sequence such as domain join, windows activation, bitlocker, and antivirus installs.
For a complete guide on how this is done: See Johan’s guides: I follow them religiously for one reason: deviation from his teachings all but guarantees pain. Compliance ensures happy deployments. ’nuff said.
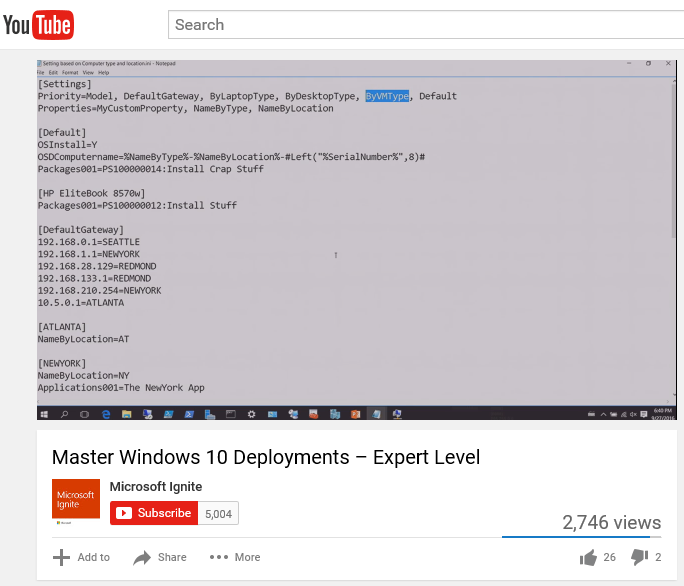
Had the privilege to study under the two “Jedi Masters” themselves Johan and Mikael this summer in Redmond, and some of what they covered there they presented last week at Ignite. Check out their video below!
Mikael covers using MDT to build images, which is my preferred way to build images. Its definitely worth checking out!